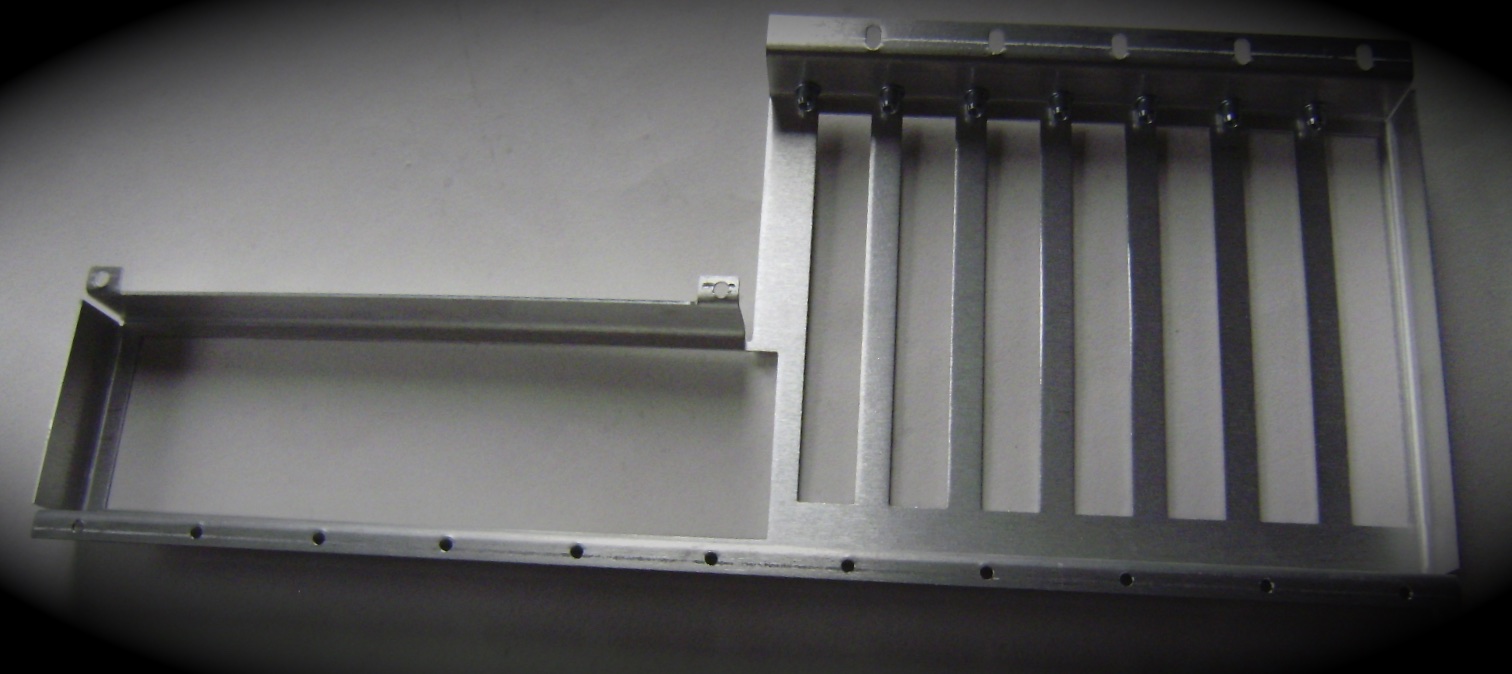
This full ATX kit has a backplate featuring a single 120 fan mounting. The fan mounting hole is positioned so that it will enable the use of any of the all in one 120 water cooling solutions on the market, such as the H80, H80i, H70, H60 from Corsair or the Antec Kuhler H20 620.
Here are some pictures.

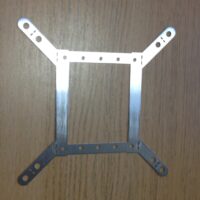
The ATX High 120 Kit is available now and contains everything you need to convert the case to ATX format – this means you get our amazing quality full ATX 5mm perspex motherboard tray with mounts tailor made to fit your G5, every screw and a new full ATX IO shield. All ATX kits are priced as follows: £70, €85 or $112.
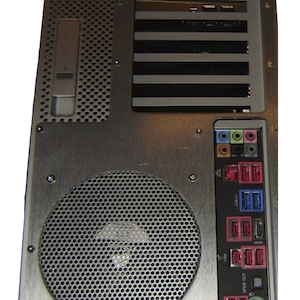
Please note that All our G5 ATX kits are now supplied with an all aluminium IO shield at no extra cost . This new development has a large threaded insert for securely fastening your PCI-e cards in place and is supplied as standard with a brushed finish. Also the area around the IO opening is slimline so as not to provide any interference with 120 fan shrouds.
All aluminium ATX shield cut and folded to match the G5 backplate perfectly.
The rear pattern of the backplate and the internal tray of the ATX High 120 kit place the PCI-e slots high up in the case, this allows you maximum room at the bottom of the case so that you can either place an ATX power supply on the case floor or you might choose to modify your power supply to fit it into the original power supply enclosure of the G5. * see note at foot of page
The ATX High 120 kit requires you to cut the top shelf and to re-position the original hard disk caddy as the “High” kit version intrudes into the top shelf area. This means that it is not suitable for modders wanting to mount a full size optical drive in the original G5 position.
Please note that a kit version placing the PCI-e slots lower in the case (our “ATX Low 120 Kit“) is available and, if you wish to retain use of an optical drive within the original location and/or retain the original hard disk caddy in the original position then the “low” ATX version is the one that you should choose.
Also please note that the perforated mesh grill is not supplied any more as a part of this kit, but is available to buy separately ( at a small extra cost) here.
We are often asked for just backplates or just trays. Please do not hesitate to ask if you do simply want some parts not listed separately on this site as I am happy to provide partial kits on request, please email me: in**@th**********.com
Additional information, including instructions download, on this and the other G5 products kits can be found via our “Kits” menu section.
* Note. If you are considering rebodying an ATX power supply into the original G5 power supply enclosure then please remember that this should only be undertaken if (a) it is legal for you to do so in your country and (b) you have sufficient skill to carry out the job. Takng a power supply out of it’s original case will void the PSU warranty and expose the internal components and so may expose you/users of your creation to risk of electrocution. We do not provide instructions on how to do this task and if you decide to do it then it is undertaken at your own risk!


The obvious option for Power Mac G5 conversion.
I purchased one of these about half a year ago. The Laser Hive is by far the superior choice when deciding on a G5 mod. Service was quick, shipping came sooner than expected.
The Laser Hive provided me with everything I needed, (and more), in order to install the High ATX Backplate into my G5. Instructions were perfectly clear, only took a small amount of studying and planning in order to install.
I gave this product 4 stars because of one tiny gripe I’ve been dealing with since day one: the PCI expansion slot screws that are provided with the kit are incredibly hard to work with.
This is partially due to the fact that the expansion slots are inset to the right side of the case’s inside window. This means that the angle the screws get installed through will not be straight-on, and have no choice but to be threaded through on an angle.
Because of this angle, more than half the time, the provided screws create their own threads into the PCI expansion slots. This creates insecurity as far as holding what’s inside the slot, as well as damage to the already threaded holes inside the backplate.
I would have preferred thumb screws in order to make the process go smoother.
Otherwise, the entire kit is incredible. I recommend it to everyone and anyone thinking about a Power Mac G5 mod.
Thanks for the comment Mike, some of this is due to the G5 construction itself as you say. However, I am taking this on board and looking to see if there are any M3 thumbscrews that I could provide as an alternative.
All best,
David.
A very good lord to handle for a Mac G5 conversation. Saved tons of time.
A few minor gripes:
1. I had to guess and check on where to exactly mount the motherboard tray and back plane. You HAVE to mount the motherboard tray FIRST, gently insert a motherboard and line up the backplate to line it up. Cumbersome. Not sure how to improve that though. Might mention that in the instructions.
2. None of the metal pieces are sanded… Cut myself a few times and had to sand with 200 grit sand paper.
3. The pcie slots are too far inwards. They should be bent around 1/4 inch further out from the motherboard. Had to bend them to get my gpu to fit right.
4. There’s no visual of the “washer stack” kind of technique for mounting the motherboard tray, and had to guess. Was a pain to guess and check. I’d include a visual for this.
5. The screw holes for the fan are not lined up. I would include instructions to verify this and drill them out of need be.
6. I would include instructions describing EXTRA cutouts for the top shelf for cable management. I would also make the cut out section of the top shelf 4inches longer, to accommodate modern length GPUs.
7. Because of minor adjustments, I’d include screw dimensions and extra screws to get for fan mounting.
I got 4mm x 40mm machine screws, with washers and nuts for the fan mounting.
I would also recommend cutting a top fan, and include trim for that too. Modern gpu fans point upwards, and it’ll reduce heat efficiency without it. That’s what I chose to do and bought a separate fan grill+trim online to cover up the rough hole.
I would also include that the case cuts and such should be cut shirt of their final dimensions, and then using a metal hand file to get them right, and then 120 grit and 200 grit sandpaper for finishing.
You can wash the case, but do note that the retaining clip for the side panel latch will corrode, so dry that right away with compressed air and clean with rubbing alcohol.